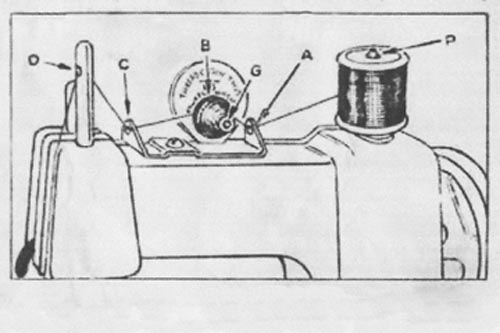
Vulcan Featherweight Toy Sewing Machine Threading Diagram
In order for the Vulcan ‘Featherweight’ toy sewing machine to work correctly it is essential that it is properly threaded.

Vulcan ‘Featherweight’ Threading Diagram
To Thread a Vulcan ‘Featherweight’:
- Start with the needle in its fully raised position and place the cotton reel on the reel pin P
- Pass the end of the cotton through the loop A
- Next pass the cotton over and once around between the tension washers B
- Thread it up through hole C
- Thread it through hole D in the top of the needlebar
- Pull the cotton down the side of the machine and pass it through the eye of the needle from left to right
- Pull 3 inches of cotton through the needle and lift the presser foot so that the end can be fed through the centre of the foot and out the back of the machine under the foot
- When starting to stitch keep a slight manual pull on the end of the cotton until the first few stiches are completed
IMPORTANT - Many apparent problems with getting these machines to sew properly are just the result of not following the final two steps above.
IMPORTANT NOTE
Some early Vulcan Featherweight's used the original tension arrangement from the Vulcan Mk1. See below:

Early Vulcan ‘Featherweight’ Tension Arrangement
For Vulcan Featherweight machines with the tension arrangement shown above, please follow the threading instructions for the Vulcan Mk1. These are different, and it is important to use the correct threading appropriate to your particular design of tension mechanism. In particular the thread does not wrap completely around the tension discs with this design.
