Singer 30K Sewing Machine Threading Diagram
The Singer 30K sewing machine has a complex tension control arrangement and hence a similarly complex threading path. In order for the machine to work correctly it is essential that the machine is properly threaded.
NOTE - It goes without saying that just like any sewing machine, the 30K should have ALL of its tension elements in place. Unfortunately as Singer 30K machines have rocketed in value, some unscrupulous internet auction sellers have been palming off incomplete 30K machines with either missing elements, or homemade bits that are far from correct, and of course completely failing to mention this to unsuspecting buyers. BE WARNED - check before you buy. Would you buy a car with the gear lever missing at any price ?
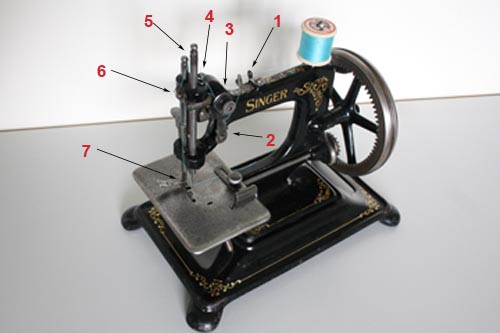
Singer 30K Threading Diagram
To Thread a Singer 30K:
- Start with the needle in its fully raised position. The flap on the upper cross shaft at the rear of the machine should then be in its bottom open position.
- Pass the thread through the holes in the 2 sideplates of the thread guide mounted at the back of the machine above the rear cross shaft (Photo 1)
- Pass the thread over the top arm to the front of the machine and loop it behind the hook on the flat tension pressure plate and then lift it upwards behind the plate towards the tension discs (Photo 2)
- Insert the thread under the left side and between the 2 tension discs and raise it upwards (Photo 2)
- Clip the thread into the wire guide on top of the needlebar arm and then pass it through the hole in the top of the needle bar (Photo 3)
- Insert the thread between the small tension discs on their left side (Photo 3)
- Thread the needle from left to right, noting that it is essential only to use the correct 24x1 needle (Photo 4)
Singer 30K Threading Photos
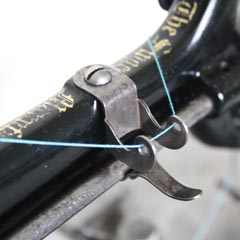
Singer 30K Threading - 1
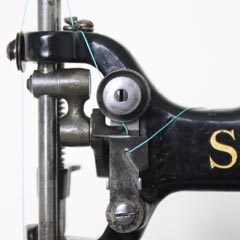
Singer 30K Threading - 2
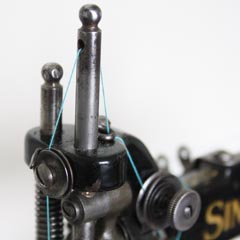
Singer 30K Threading - 3
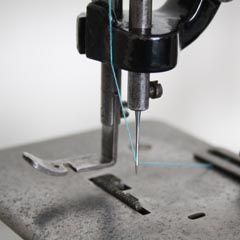
Singer 30K Threading - 4
