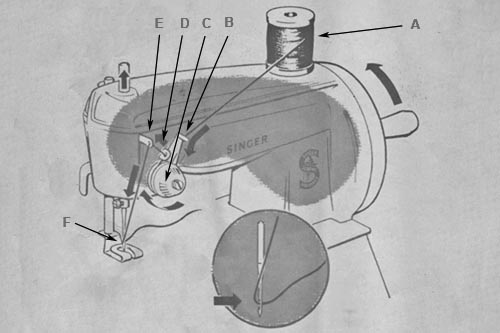
Singer Sewhandy 40K Toy Sewing Machine Threading Diagram
In order for the Singer Sewhandy 40K toy sewing machine to work correctly it is essential that it has the correct 24x3 needle and that the machine is properly threaded.

To Thread A Singer Sewhandy 40K:
- Start with the needle in its fully raised position and the presser foot lowered.
- Place a spool of cotton of the spool pin (A).
- Pass the cotton through the hole (B) in tension disc bracket
- Wrap the cotton clockwise around and between the tension discs (C).
- Pass the end of the cotton upwards and to the left through the hole (D) in the tension disc bracket.
- Pass the end of the cotton to the left through the needlebar sidearm (E).
- Lower the presser foot and thread the needle (F) from left to right, ensuring that the correct 24x3 needle is being used.
- Raise the presser foot and pass the end of the cotton down through the centre of the presser foot and draw it out the back of the machine UNDER the presser foot.
- When the presser foot is down NEVER turn the handwheel without material under the presser foot or damage may occur.
- When starting to stitch keep a slight manual pull on the end of the thread until the first few stiches are completed.
IMPORTANT - Many apparent problems with getting these machines to sew properly are just the result of not following the final few steps above.
Please see our dedicated page regarding the 24x3 needle and a suitable substitute.
